DIGITAL HUMAN - TECH BREAKDOWN
the tech and development behind the digital human
DIGITAL HUMAN - TECH BREAKDOWN
the tech and development behind the digital human
DIGITAL HUMAN - TECH BREAKDOWN
the tech and development behind the digital human
Tech Breakdown - Section 1
Photogrammetry Scan Processing
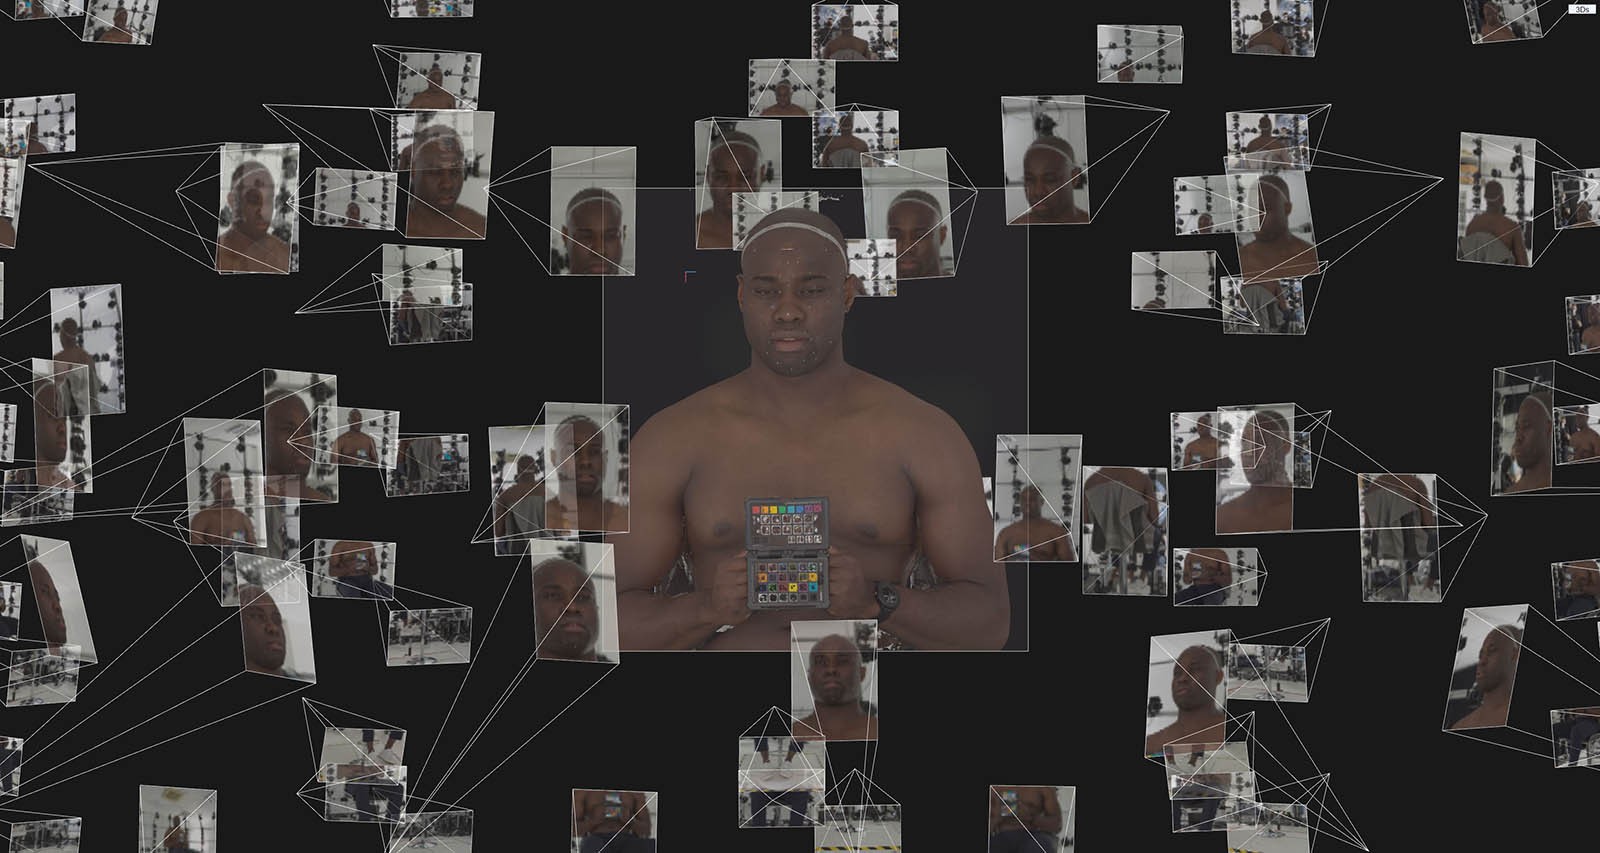
We captured 88 so-called facial action units from Fred, including the neutral state of his face and all the extreme poses. His outfits were scanned in layers to improve the quality of the reconstruction and make the refining process easier later down the pipeline. Our scanner back then consisted of 250 DSLR cameras with 80-130 mm focal length, 24 of them entirely dedicated to the head area. We used Reality Capture for the reconstruction of the 3D scan data; to enhance the reconstruction quality of our neutral pose and the extreme poses, we synthetically enhanced the captured images with Gigapixel AI.
Working with the Scan Data
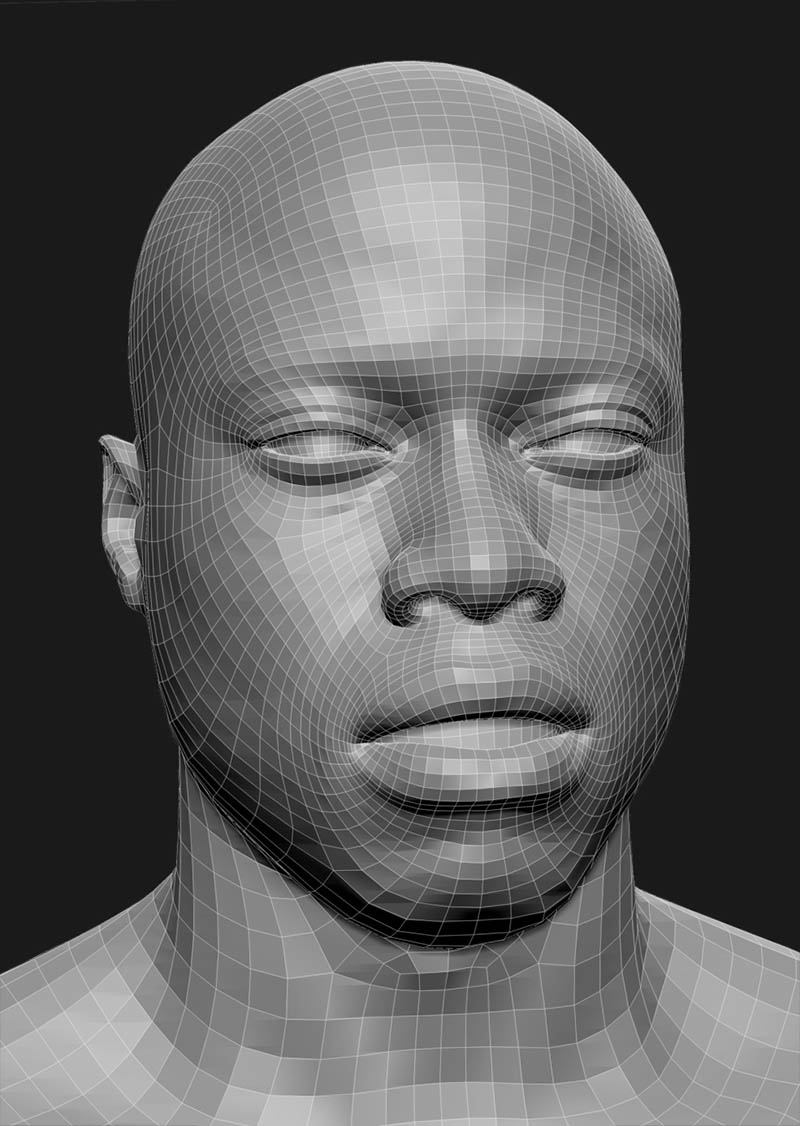
Before being further processed, all scans were rudimentarily cleaned from artifacts. We used Wrap3D to align all our reconstructed scans to our neutral pose, representing a fully relaxed face with no emotions whatsoever. This was done to ensure consistency and accuracy during the blendshape extraction process. Once our Basemesh was wrapped to the aligned Scan, the scanned expression was ready for the blendshape extraction process.
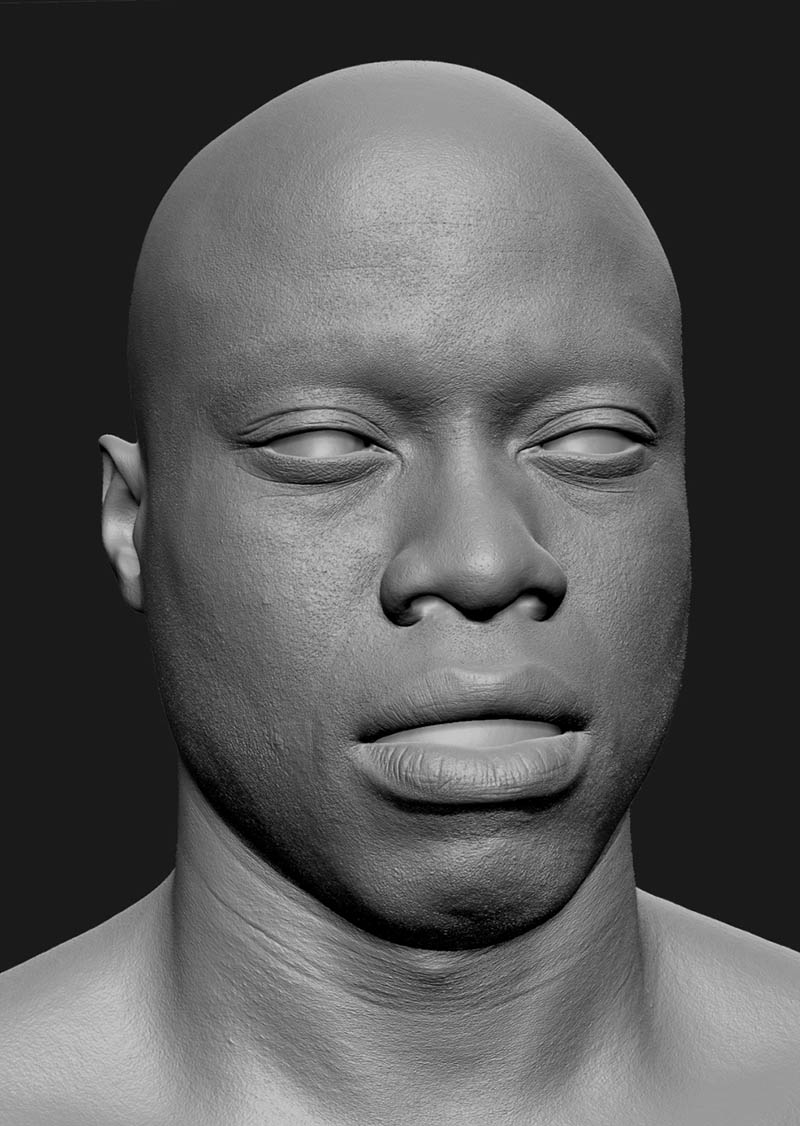
The neutral pose and a by us defined set of extreme poses, which each represented an emotion expressed to the maximum, were further processed and prepared for detailing by enhancing it with extra details; some manually added some generated from textures. Those ultra high res models were then used for baking Normal Map Data which was later used in the engine to visualize Fred's finest surface Details and surface deformations.
Generating Additional Data
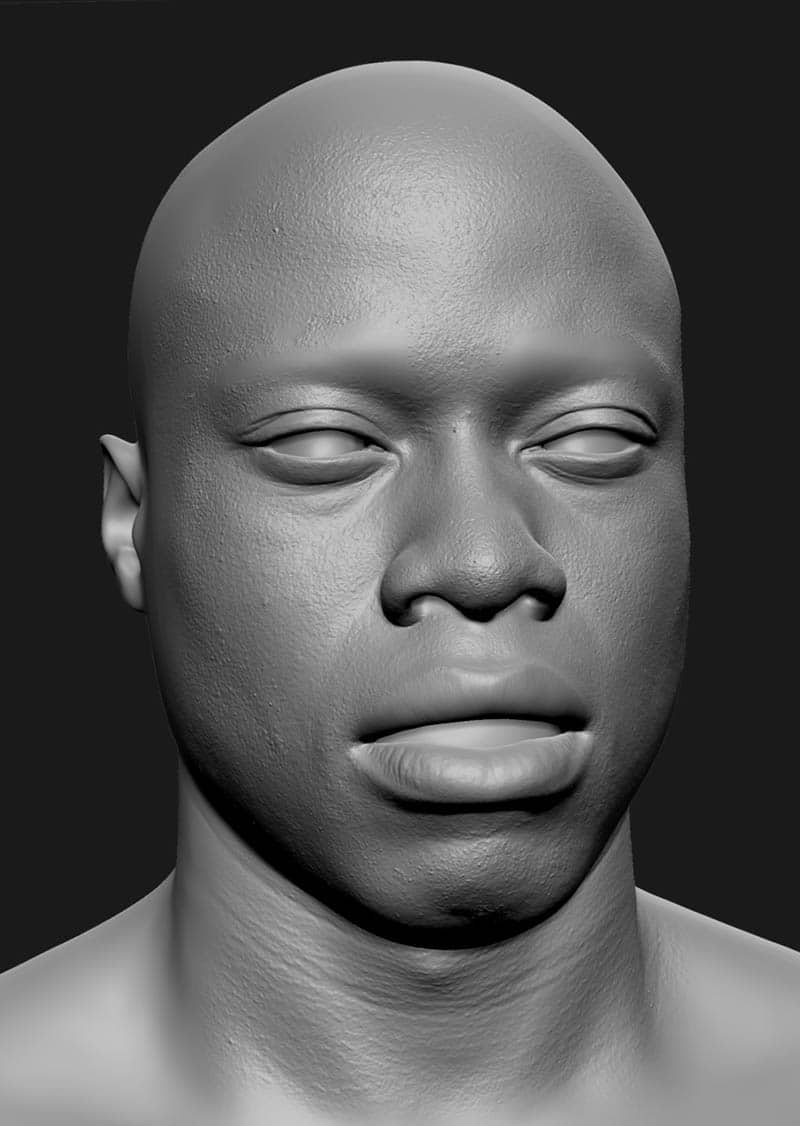
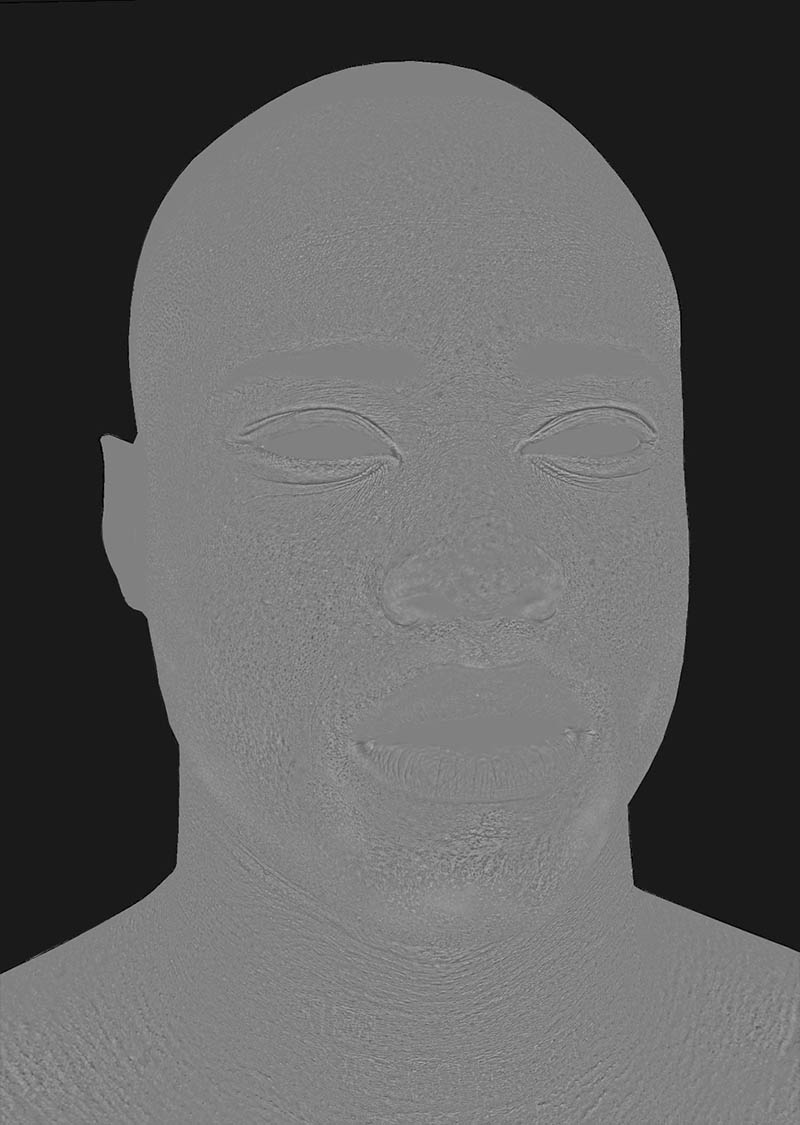
In addition to the reconstructed geometry data and to recreate even the finest details of Fred's face, we generated displacement maps with a resolution of 16k in Photoshop via highpass filters based on cleaned and refined versions of the captured photogrammetry textures. Depending on the detail and area we generated displacement data for, we used different sampling sizes and adjusted the range of the displacement values to get as close as possible to the real-life reference. Additional heightmaps were generated for all our "hero" heads or rather the neutral pose and all the chosen extreme poses. Later, these textures were used in ZBrush to recreate Fred's details on the 3D mesh.
Refining the Headscans
The chosen extreme poses, along with the neutral pose, got a detailing pass in Zbrush. For that, we used the cleaned scans plus the generated displacement maps as a starting point, fixing the errors caused by the displacement map and adding/refining detail where needed. We made heavy use of the Zbrush layer system to separate the different displacement maps and make manual adjustments; this gave us great control over the intensity of the displacement map detail intensity and to change it nondestructively later on. Since all the wrapped scans share the same basemesh i.e. topology, we were able to use the detailing layer stack from the neutral pose as a base for detailing all the extreme poses. The resulting surface details were then later baked into normal maps.
Outfit Scanning
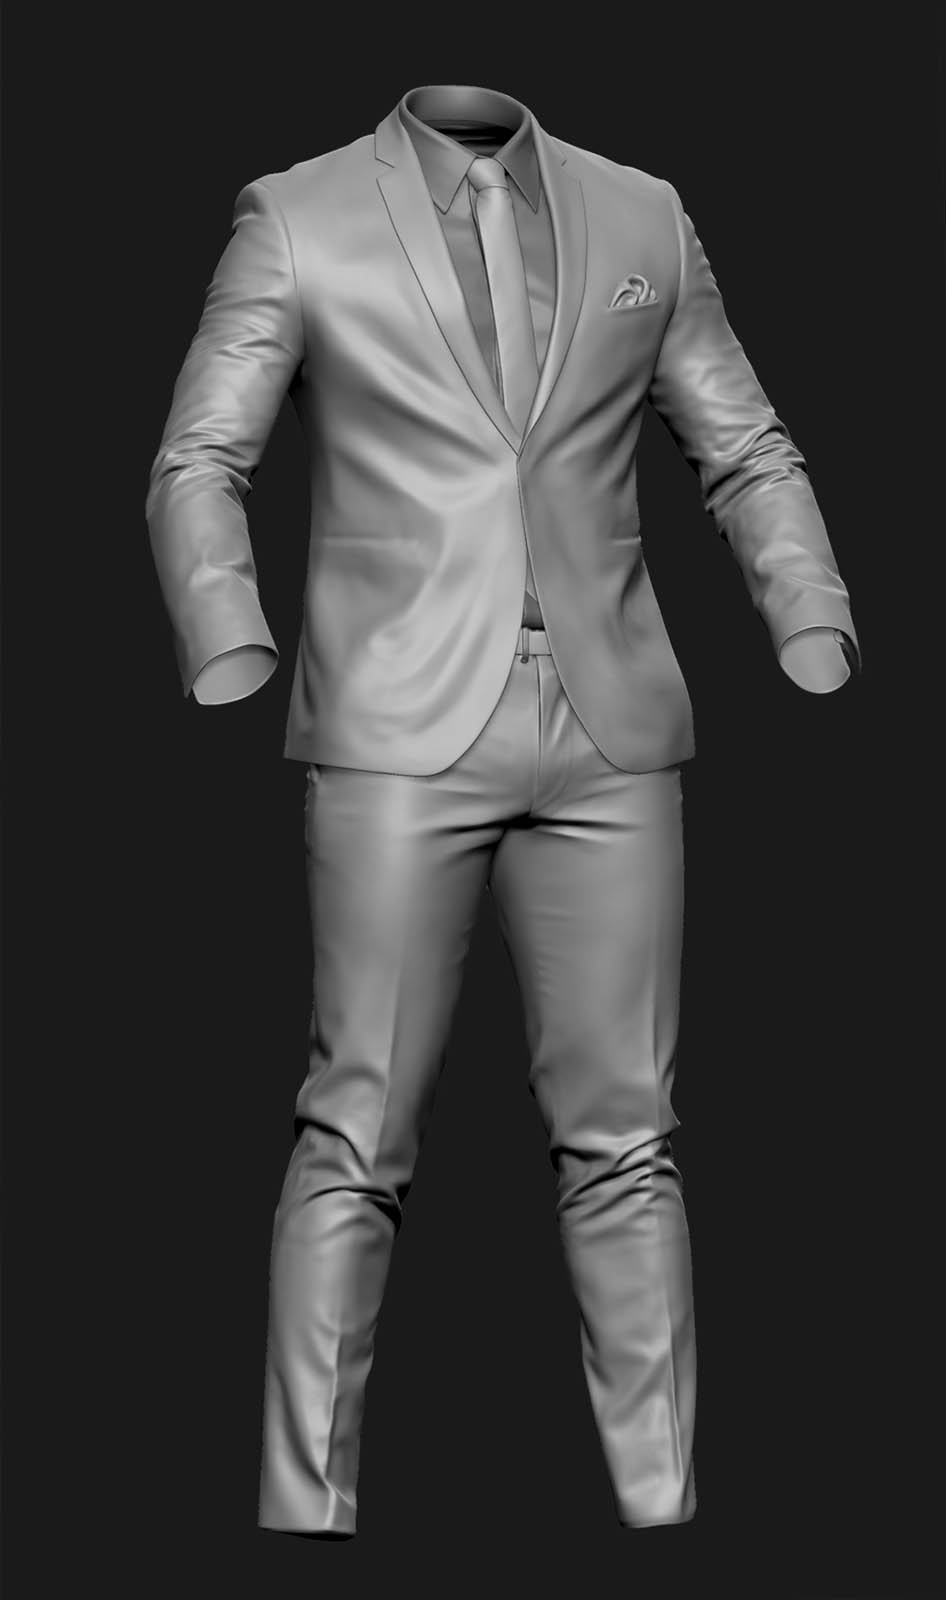
Since we scanned all of his cloth layers separately, we were able to work very precisely on the individual pieces of clothing. Detailing and refining them separately, where we used a similar workflow as we did for the head scans, working off the cleaned scan and enhancing it with displacement maps and manual detailing, i.e. sculpting. Before putting the outfit back together again, we added all the details that the clothes would create when interacting with each other.
Extracting the Motion
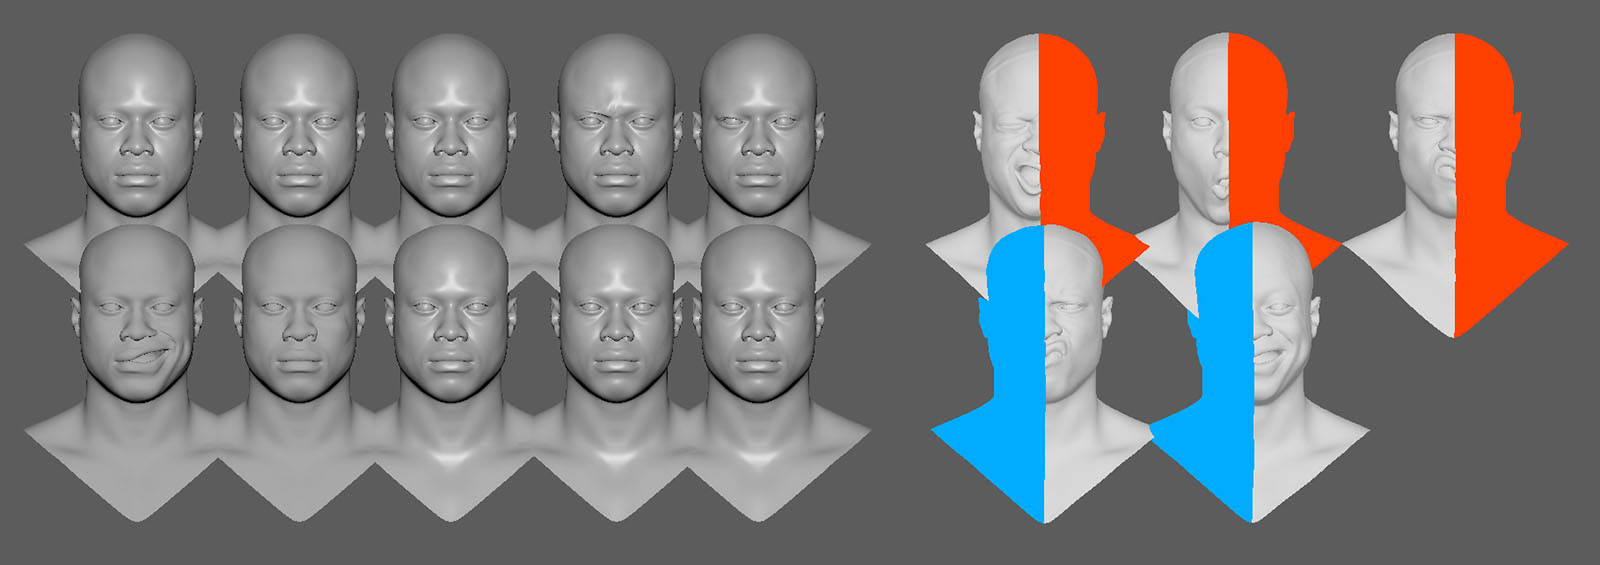
We created a diagram of all our scanned FACs, grouping them into different sections and creating flow charts depicting the gradual intensity of some expression, i.e. smiling. Based on this, we selected the areas of each FAC that we wanted to turn into blendshapes. For this, the aligned and cleaned scanned FACs were wrapped with our head basemesh in Wrap3D. The resulting mesh was brought into Maya, where it was used as a blendshape for our basemesh. All unwanted deformations in the face were masked and the final blendshape exported.
Face Separation Masks
Tech Breakdown - Section 2
Bringing Fred to Life
Capturing the true essence of Fred's acting performance was the main goal of our motion-capturing efforts. It was especially important for us to get any fine nuances that make Fred himself in terms of body movement. To achieve a full-body capturing of Fred's motion, we combined our motion data from our Xsens mocap-suit, our Dynamixyz infrared face-rig, and manual retouch steps to enhance subtle details. Combining this rich datastream through MotionBuilder and Maya was challenging and required a dynamic workflow.
Motion Capturing Session
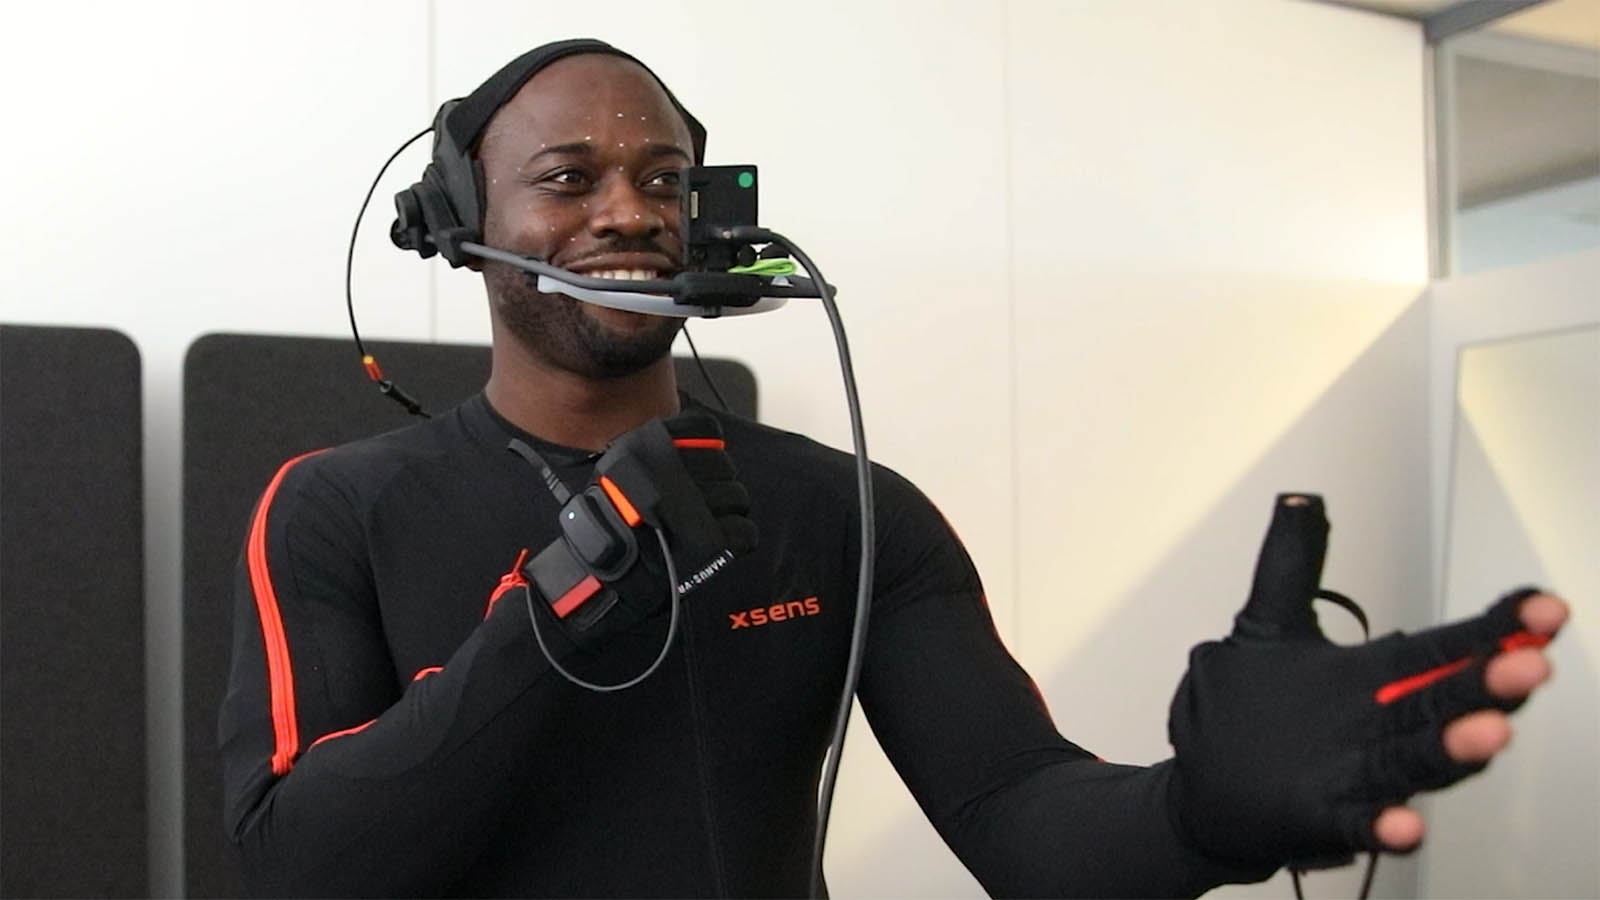
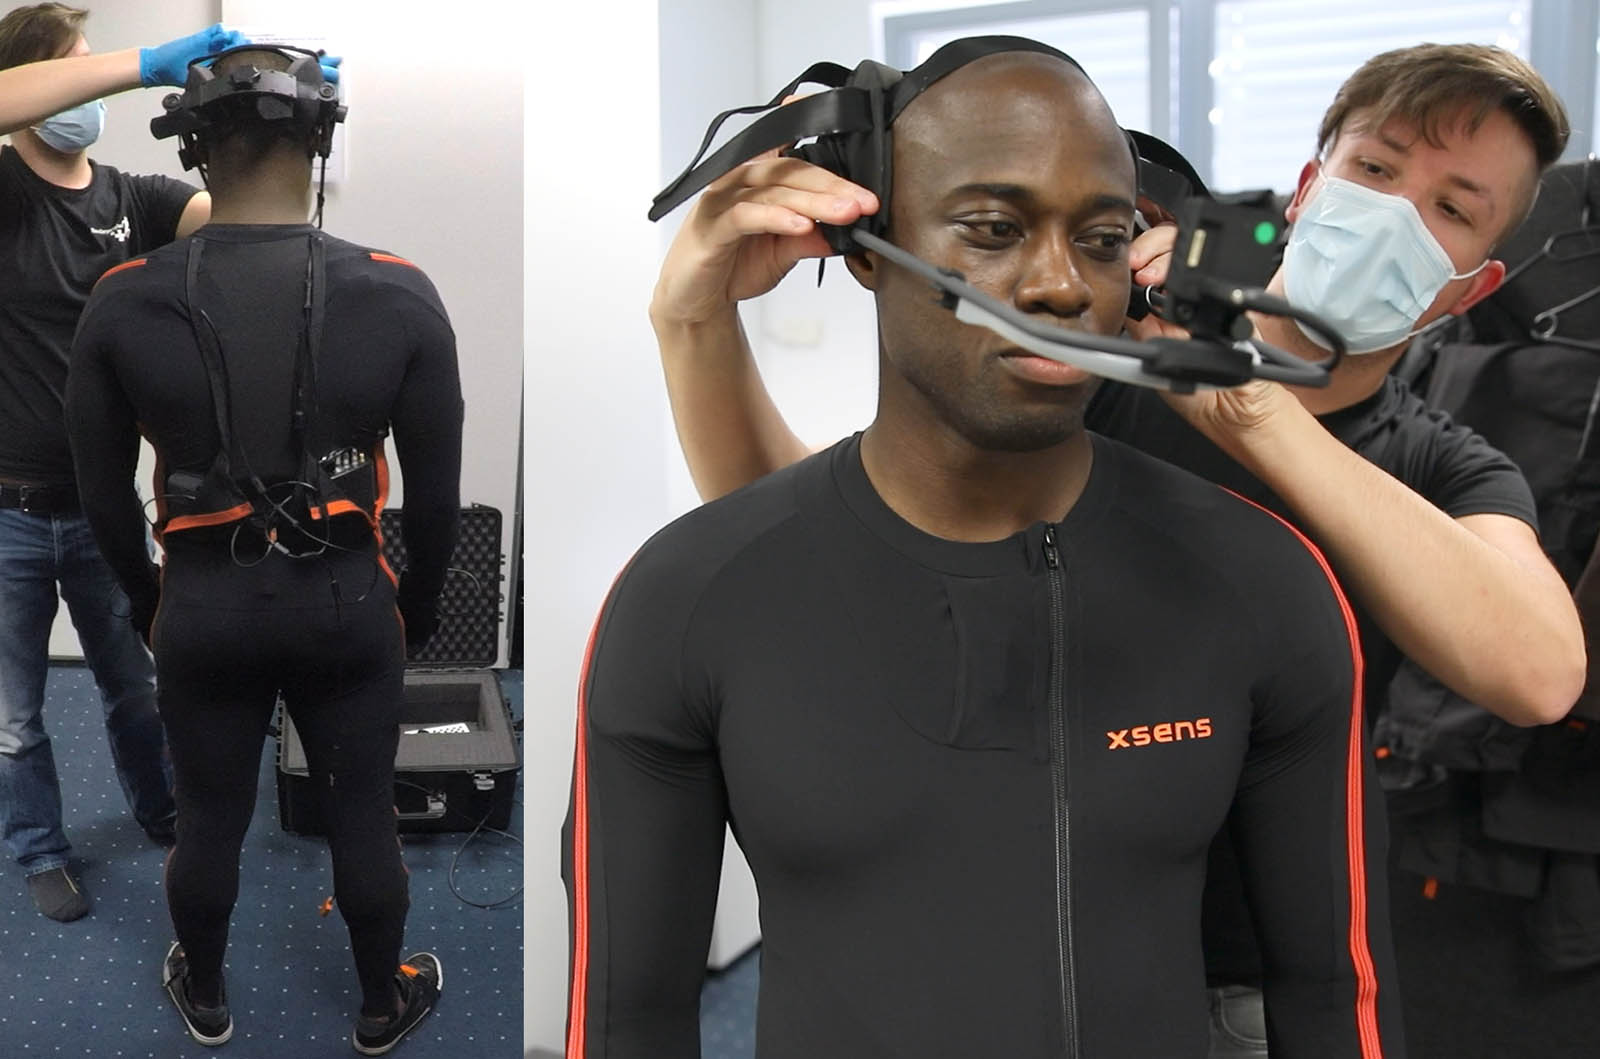
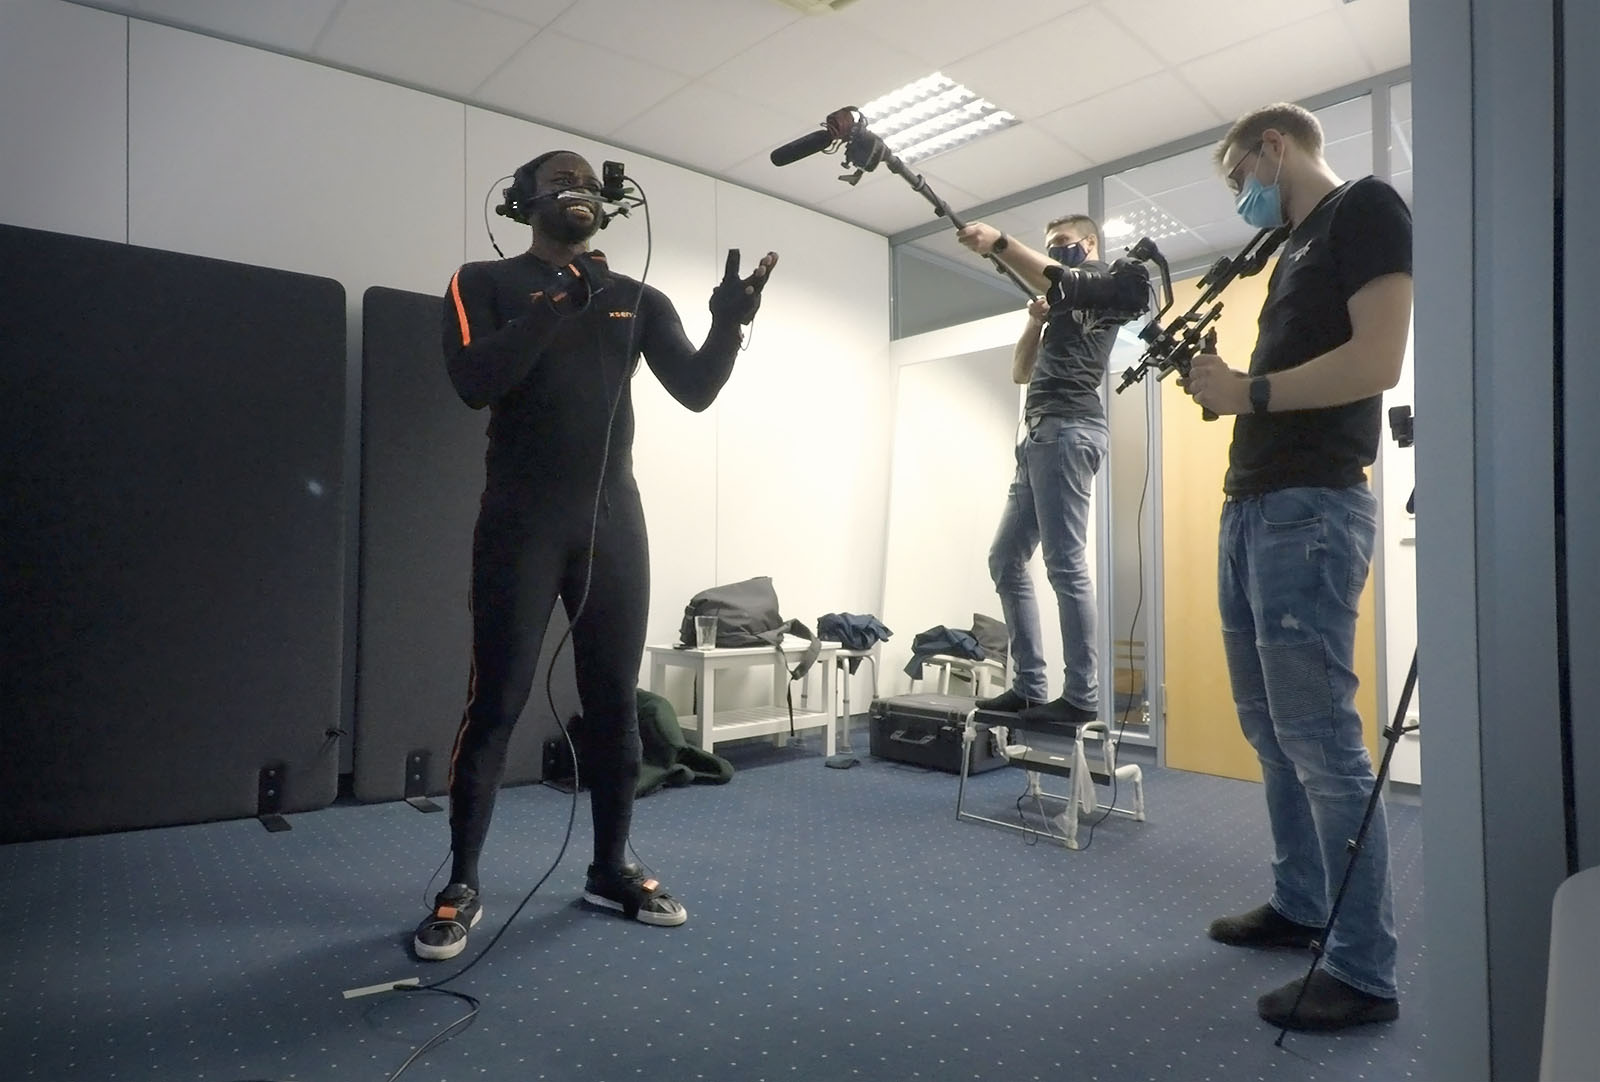
We started by outlining our overall concept and story. We set an ideal stage for our Digital Human while also adding enough creative freedom for our actor. After our story outline was set, we invited our actor for a mocap session and gave him time to interpret our script and to add his own style to the performance. We used our XSens suit in combination with ManusVR gloves to track the motion of Fred's Body with 60 frames per second, which is captured by many different motion sensors inside the suit and gloves themselves. The face is captured separately by the Dynamixyz infrared HeadCamRig. We recorded different takes in German and English and recorded different facial expressions to test out the range of motion of our mocap-data.
Since the headcam rig does not have any integrated microphones, we attached one microphone to the side of Fred's head and recorded a separate audio take with an external boom microphone to get high-quality audio of Fred's voice. To sync the 3D motion data with our recorded sound, we let our actor clap his hands, which enabled us to synchronize everything in post easily. Keeping the marker dots from our scanning session wasn't necessary for the software, but it was a nice way to improve the performance of our face capturing by making it easier to track his facial movements during the processing.
Working with the Mocap Data
We used MVN Animate, a motion capture software from XSens, to record and export all the mocap data regarding Fred’s body as .FBX files. Those were then imported into Motion Builder where they were cleaned of any visual errors like sliding feet, jittering appendages, or intersecting geometry and afterward polished regarding poses and timing. For processing Fred’s facial movements, we used Performer2SV from Dynamixyz. The software is able to track defined areas of the face and transfer those movements onto an animation rig.
To correctly transfer the movements onto our facial rig, the software needed a set of linked key poses between the video and the animation rig. Each chosen pose inside the recorded video was carefully recreated with our facial rig and then connected to the specific frame. That way, the software can generate everything else based on the movements recorded in the video. The animation than gets exported via a bridge between Performer2SV and Maya directly onto our animation rig for the head. This animation is then polished by refining certain poses, adjusting timings, and sometimes even pushing expressions further. Once this process was finished, the completed head and body animations were exported separately and then merged inside the Unreal Engine 4.
Tech Breakdown - Section 3
The Body- and Facerig Setup
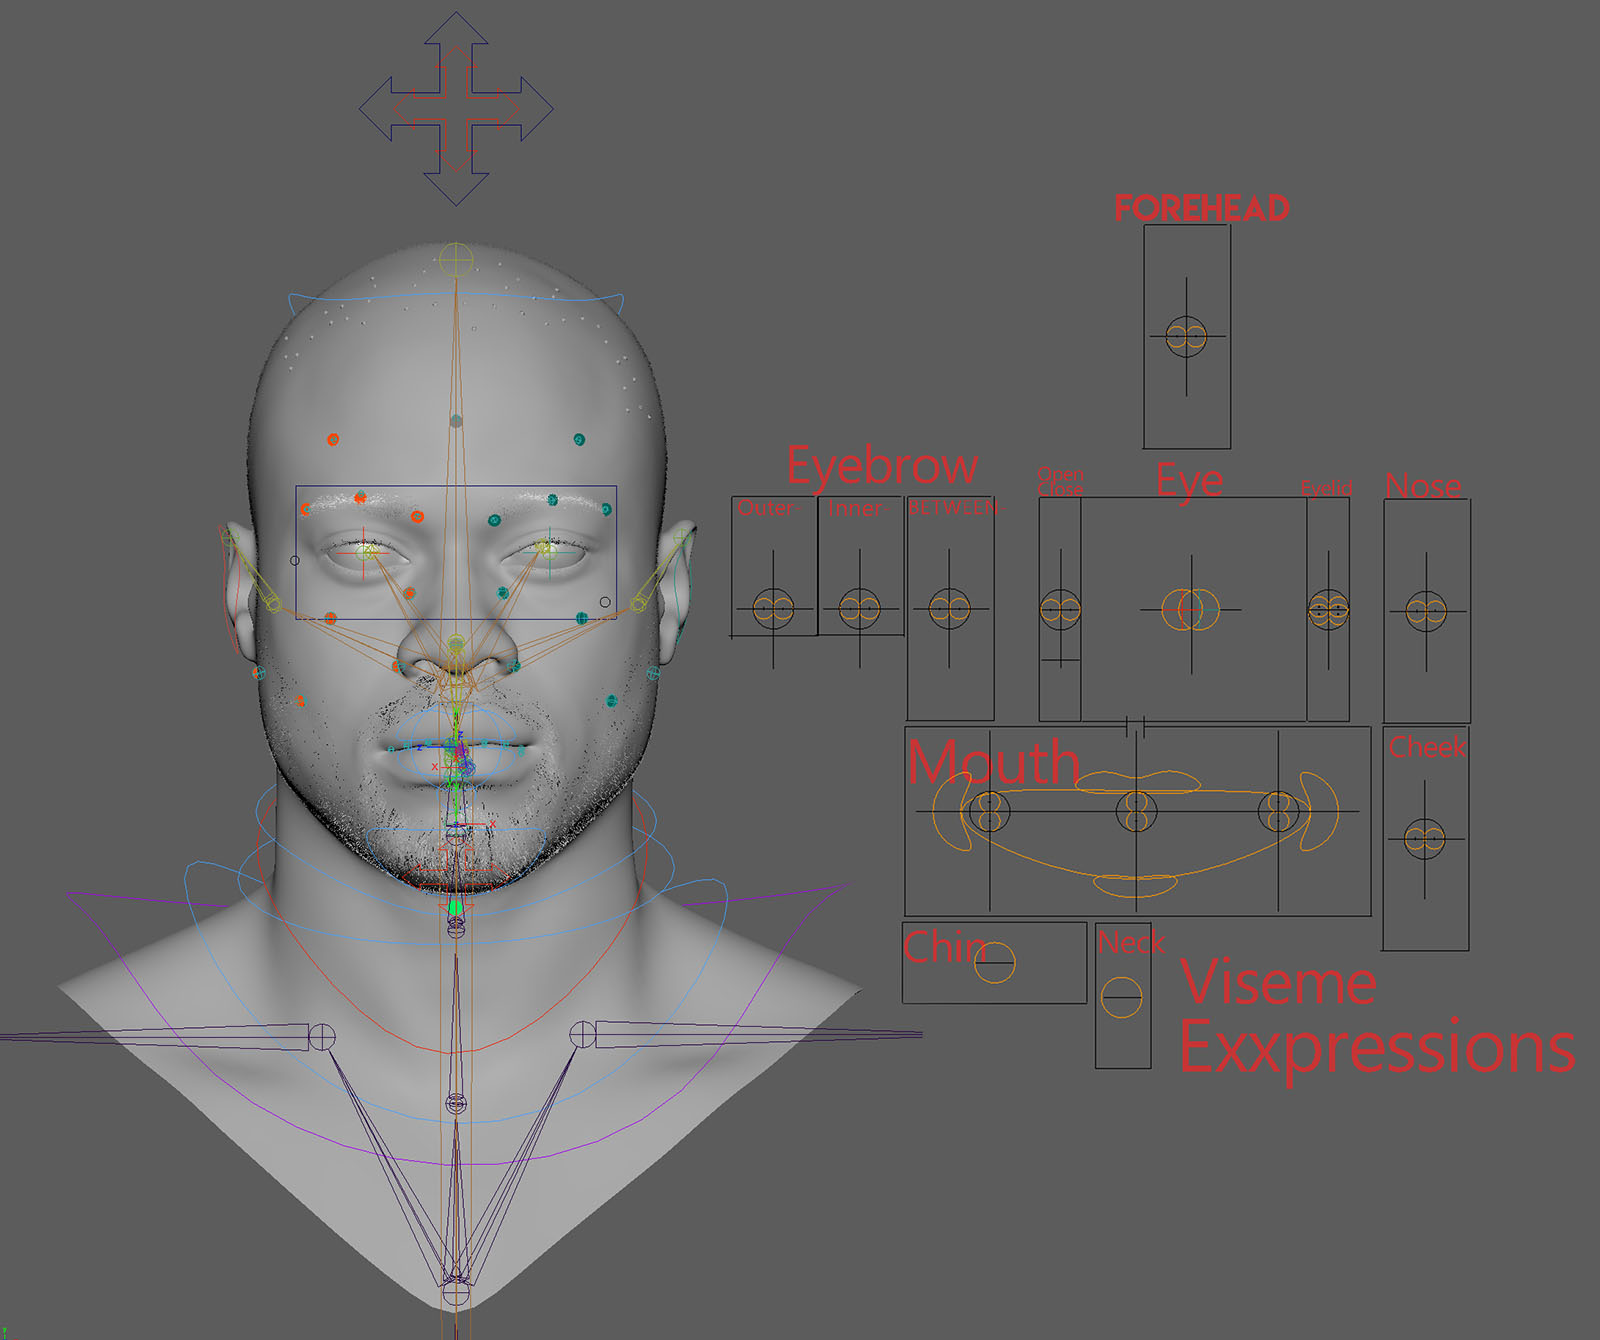
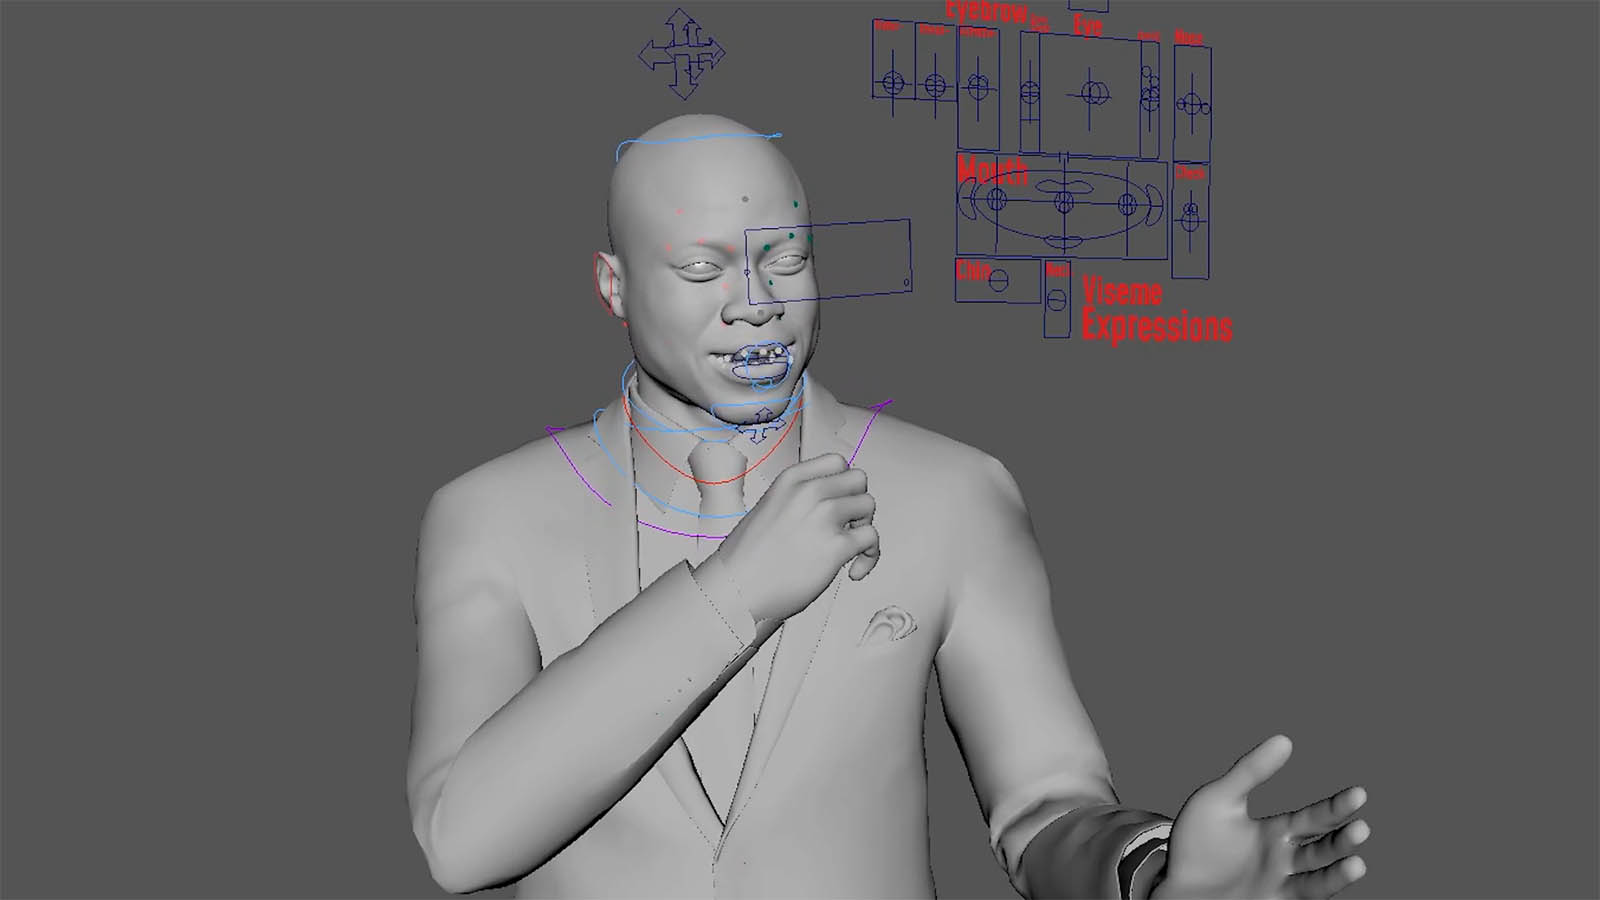
Our rig for Fred consists of two independent rig systems, one for the body and one for the head, which were later merged inside the engine. Because our goal was to give as much control as possible to the animator while still being realistic and using the scanned data, we decided to create a combined joint blendshape rig for Fred’s face. This means that we have predefined poses for each of his facial movements that are dynamically combined based on the position of the joints/controls while also giving the option to manipulate Fred’s face independent from the blendshapes to enhance the look of certain moves or poses.
Tech Breakdown - Section 4
Engine Integration
Visualizing our actor Fred correctly in 3D is equally important as 3D scanning and motion capturing. The integration of all different sources into one single unreal engine project which on top needs to run in real-time was one of our biggest challenges. Achieving realism and true authenticity plays a huge role to get our Digital Human as close as possible to our charismatic actor.
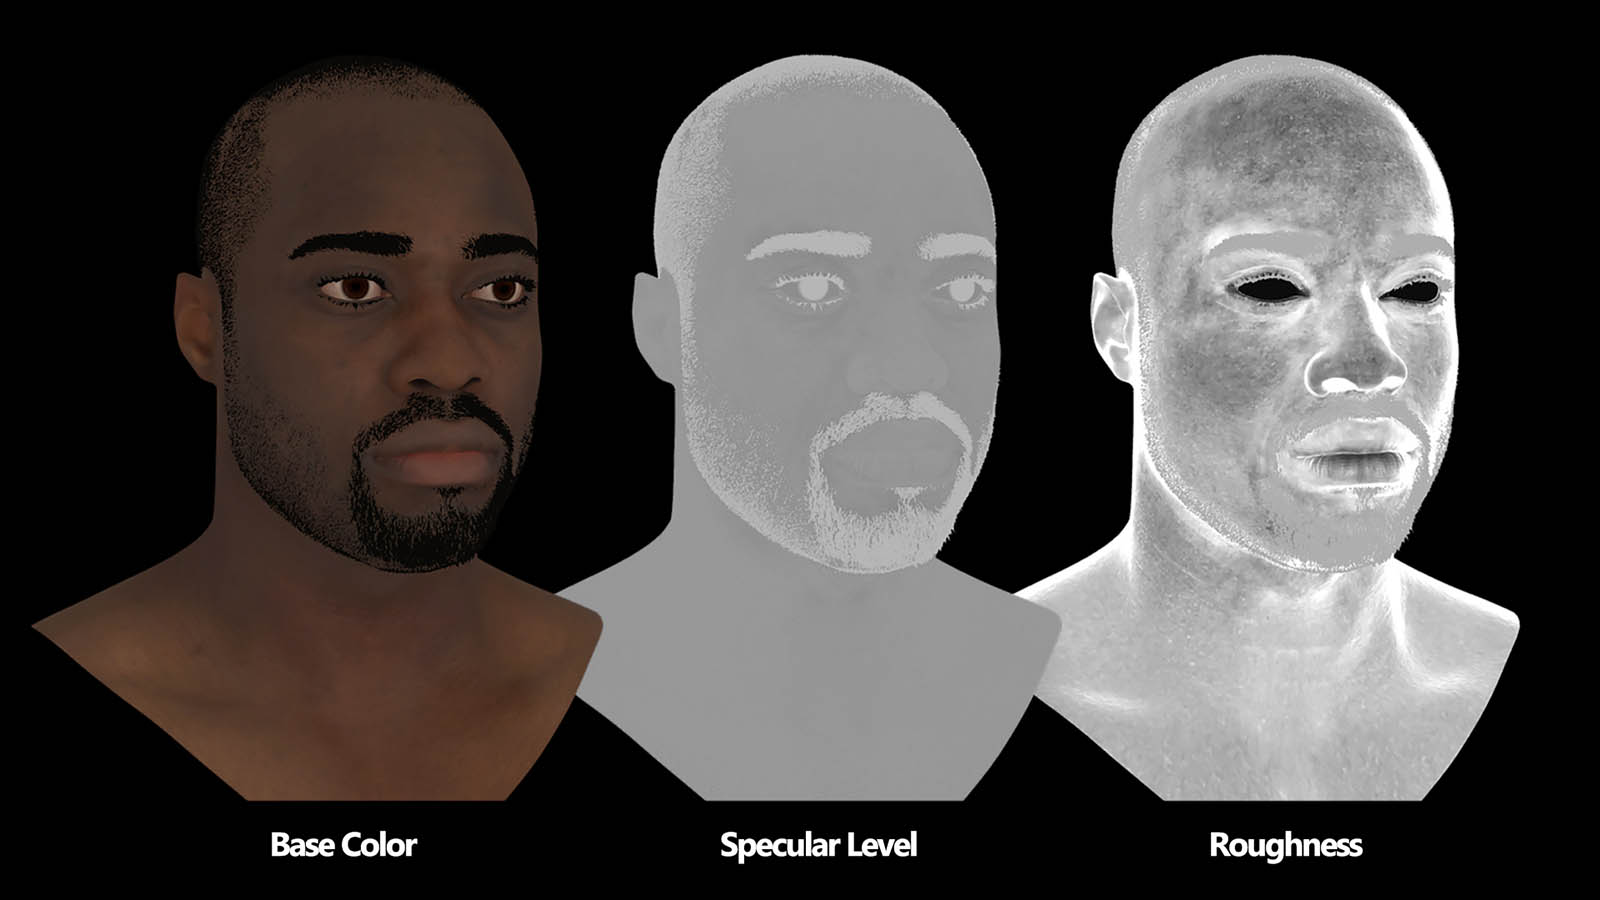
Material Setup & Texture Breakdown
Our material setup for Fred’s head is based on the integrated Unreal Engine Subsurface Profile shader; we added internal material controls over the different roughness zones of Fred’s face to be able to tweak those values inside the engine easily. In addition to that, we added an angle-based reflection behavior that better reflects the interaction of skin with light. It adjusts the reflections in areas that have a very sharp angle towards the camera.
We also added a wrinkle map setup, which means that we blend a set of 4 normal and 4 albedo maps, with a 4 channel mask defining the different facial zones, depending on the currently active Morph Targets.
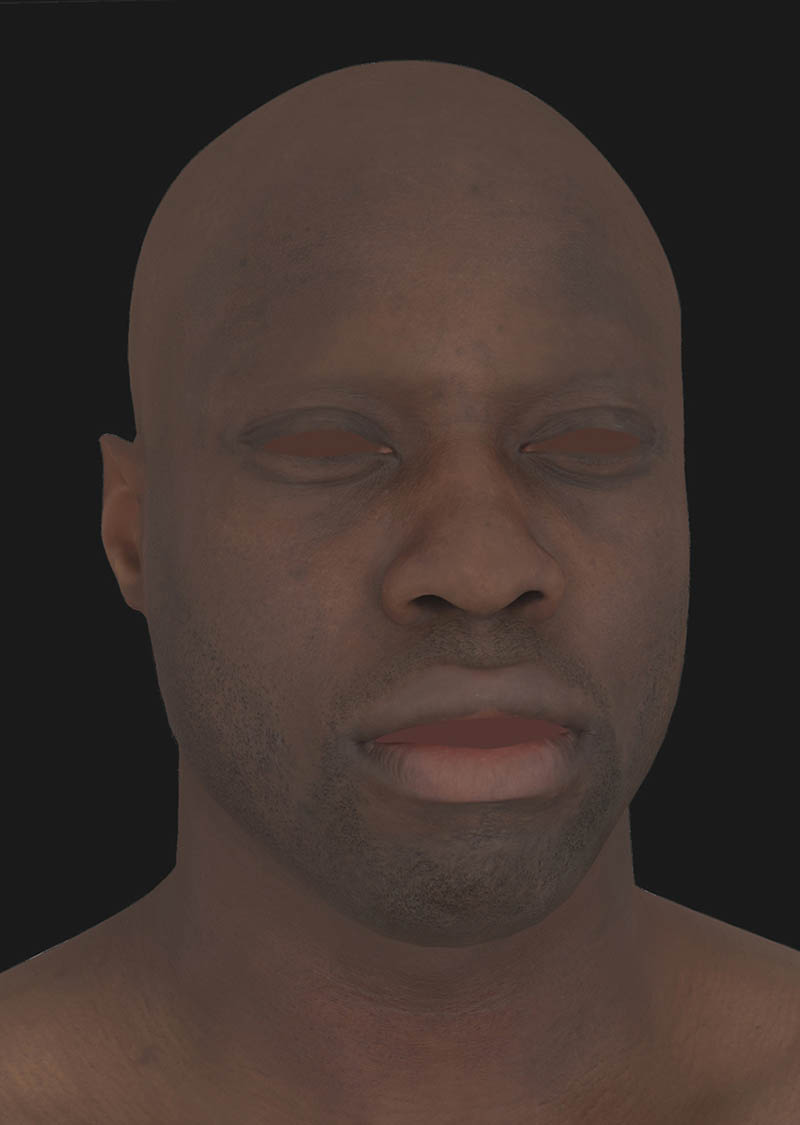
The Texture Set that was used for Fred includes 4 albedo maps (bloodflow maps), 4 normal maps (wrinkle maps), a 4 channel map including a specular level map, a roughness map, a thickness/scatter Map, as well as ambient occlusion and cavity data.
Wrinkle Map Setup
Wrinkle maps are used to enhance the visual impact of blendshape by providing details that a blendshape can't display on its own. For example, strong changes in the skin's surface structure, i.e. stretching of pores, wrinkles, etc., and changes in skin color due to blood being shifted around or tissue getting stretched over bones. That's why we used a Wrinkle/Bloodflow Map setup to visually enhance Fred's face in motion inside the Unreal Engine 4.
We created 2 sets of 4 textures for our setup, one containing the surface changes, i.e. normal map details, and one containing changes in his skin color. These textures were created by baking the albedo and normal information of Fred's refined extreme poses into textures. Since not all the surface information of each extreme pose was needed, we created a four-channel mask for each composite wrinkle maps defining the different zones where the details would be applied later, i.e. the eye area, mouth, area, cheeks, forehead, etc.
These masks were also used to blend the engine's wrinkle/blood flow maps. The big challenge was how to drive this setup dynamically since we didn't want to keyframe the wrinkle map intensity on top of the animation. So we created a blueprint setup that read the influence of each of Fred's 261 blendshapes, driving our material setup by controlling the masks inside the engine.
Hair Creation Pipeline
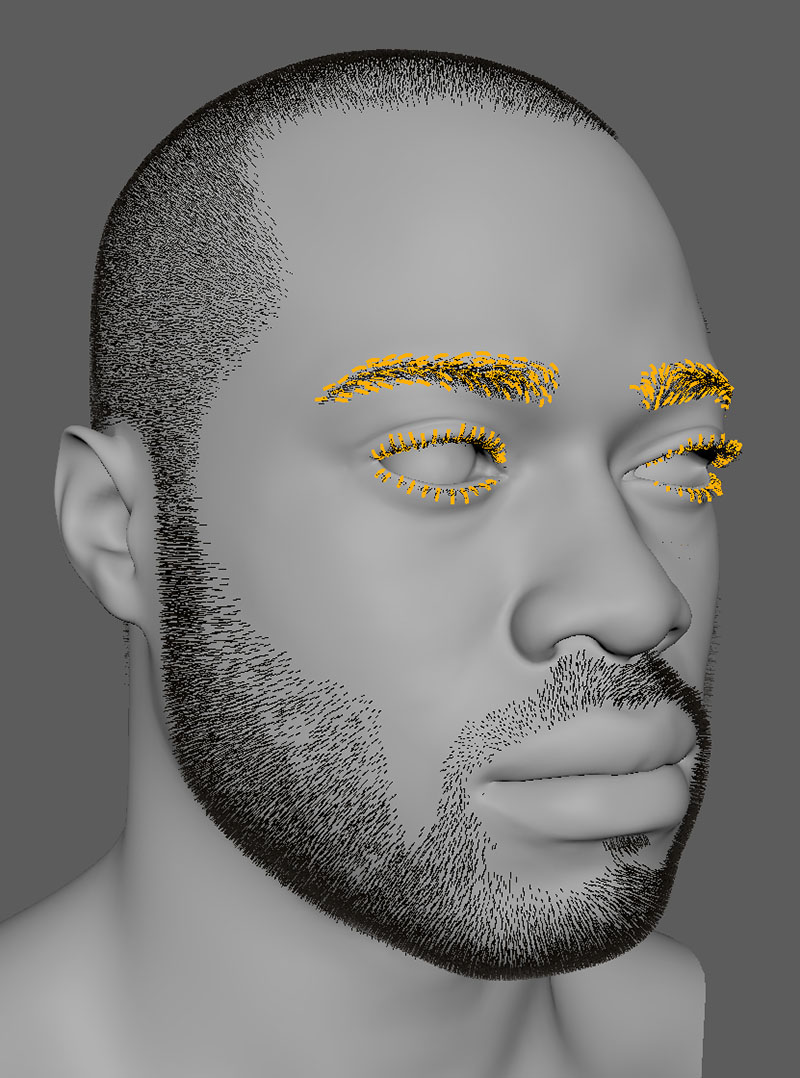
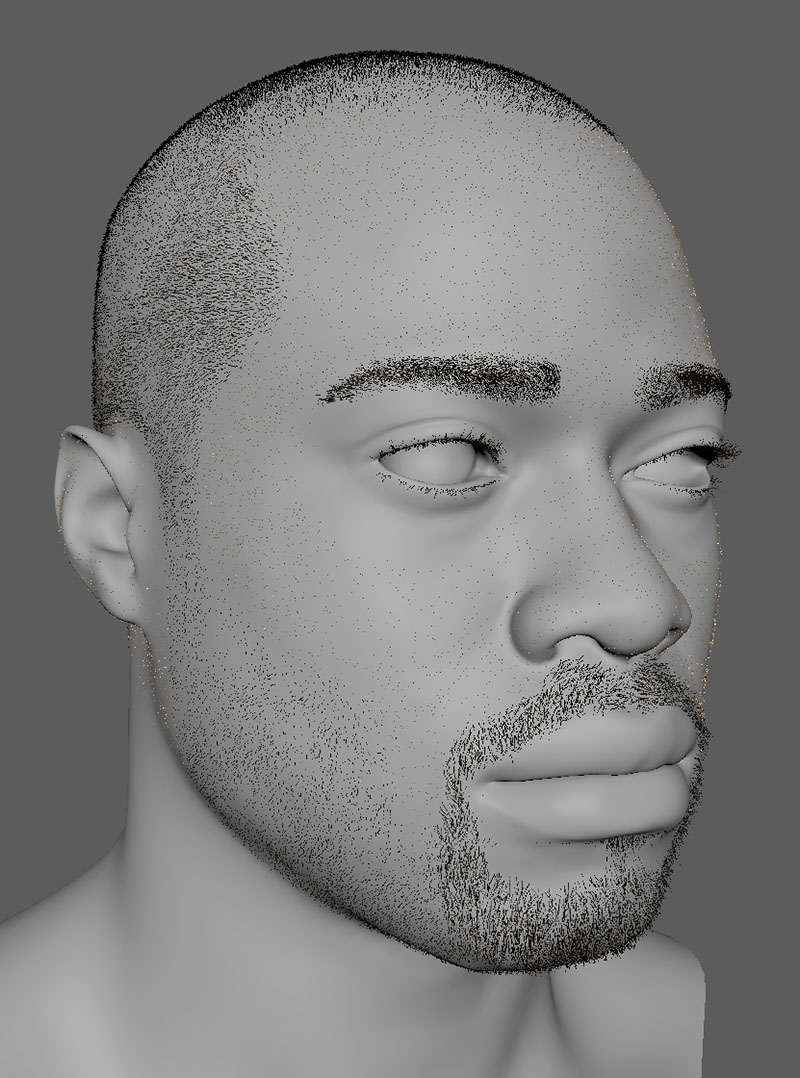
Fred's hair was created entirely from scratch based on our references. We used XGen, an integrated tool in Maya, for the grooming process. All grooms were started by creating splines on the surface of Fred's head model, representing his hair's growth direction. Those splines were then converted into so-called guides for the groom. By adding clumping, curls, and length variation, we strived to recreate Fred's hair as close as possible. That way, we created grooms for each of his hair types i.e. his top hair, beard, lashes, eyebrows, and his peach fur. The created grooms were all exported as alembic files and then imported into Unreal Engine 4 via the alembic hair plugin, where they were attached to Fred's skeletal mesh.
Rendering
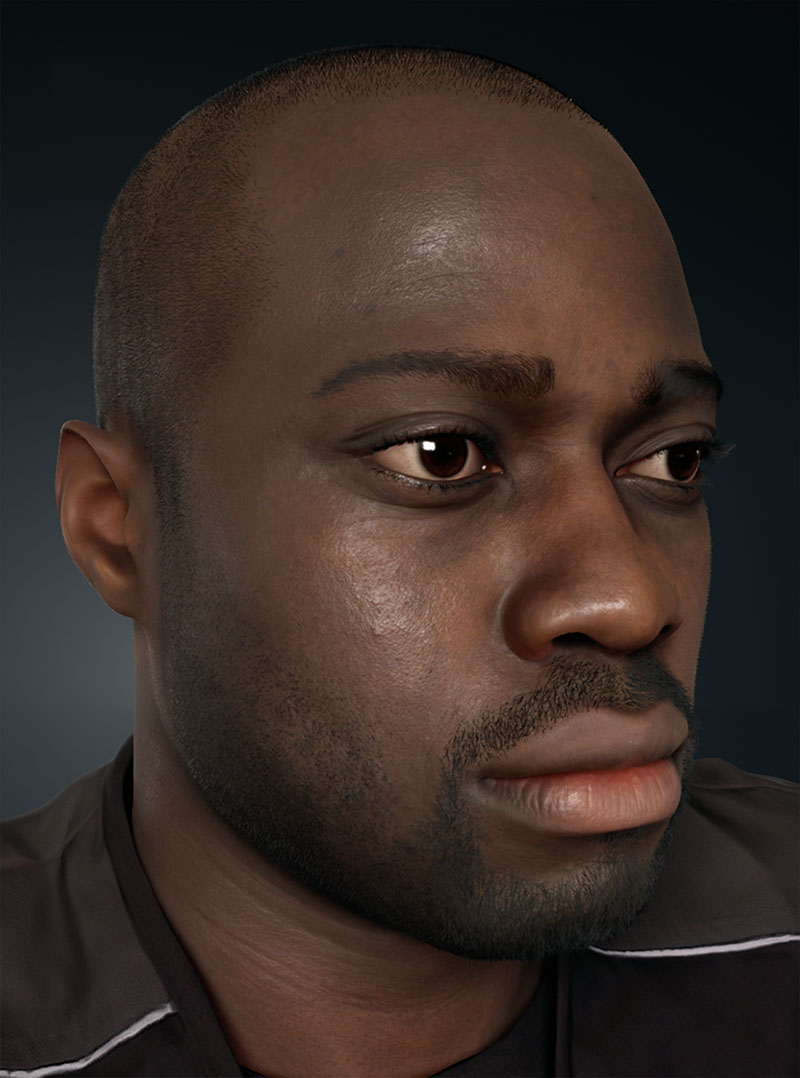
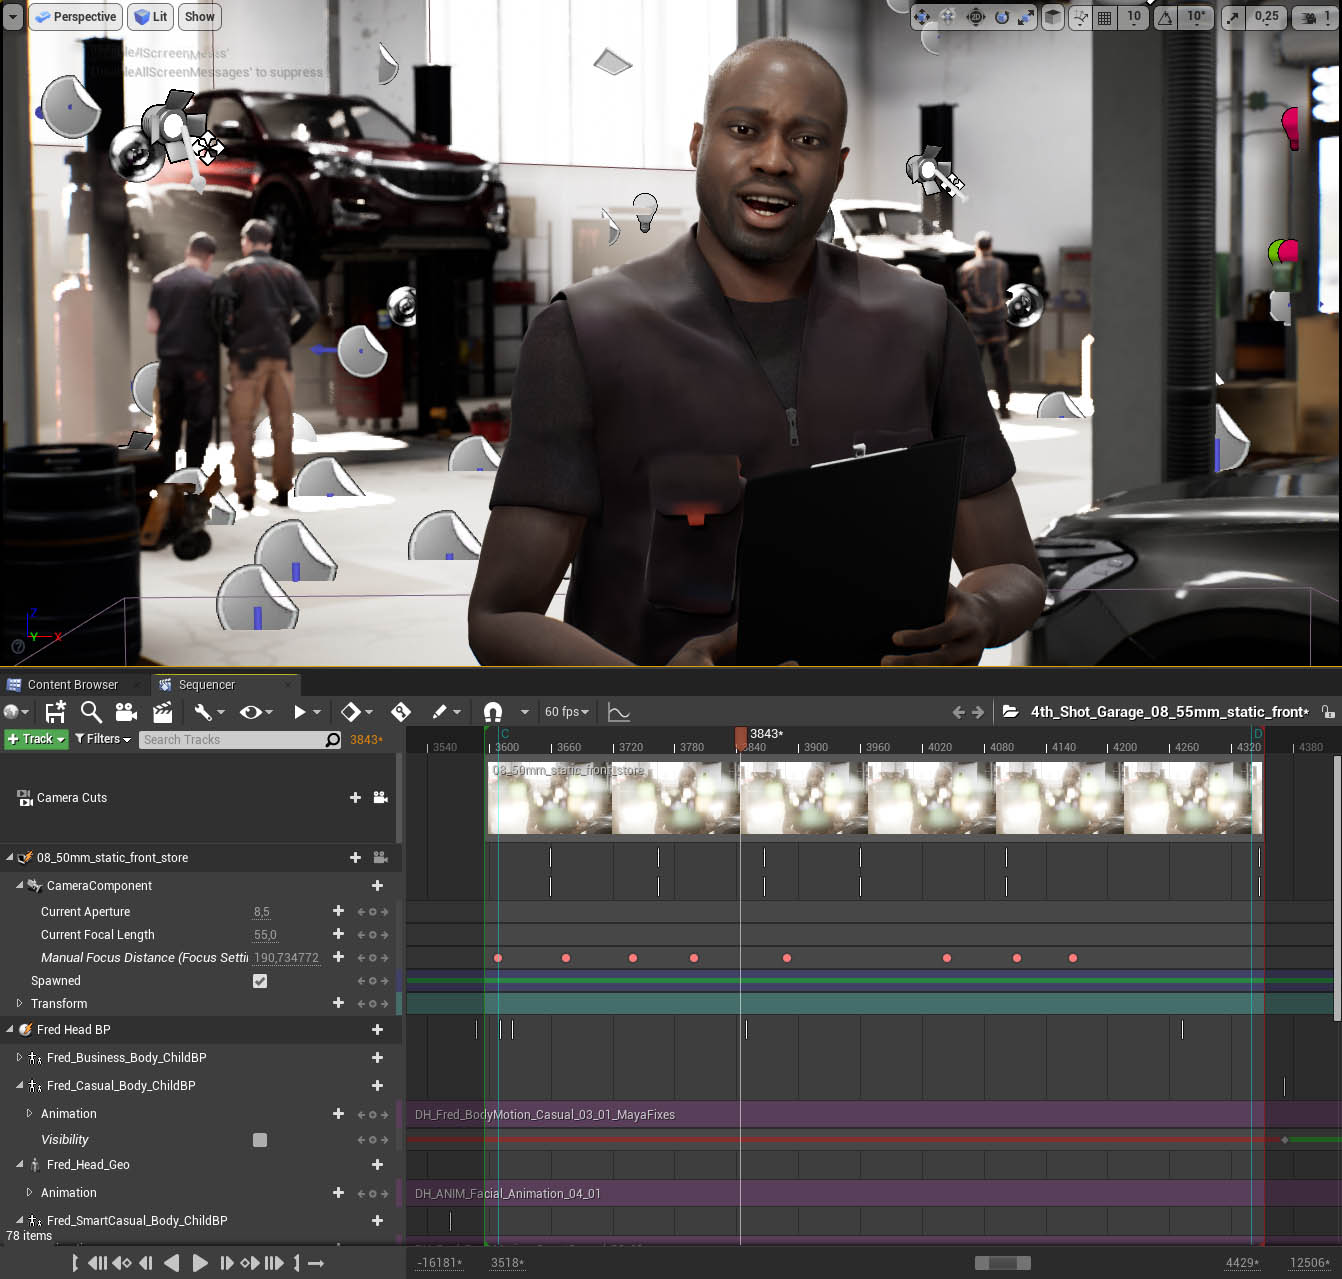
All footage was rendered inside Unreal Engine 4. We leveraged the integrated movie render pipeline to organize our renderings and render passes. This also gave us an easy way to override certain render settings on render time, making it possible to crank up the quality of certain postprocessing effects, for example, depth of field, motion blur, texture filtering, and anti-aliasing, above what is possible in realtime.
Final presentation
MEET THE DIGITAL HUMAN
We are constantly interacting with other human beings, no matter where we go. Interacting with virtual doubles and digital assistants gets more and more usual. As a result, the next logical step is to create more realistic Digital Humans who can interact with you.
Tech Breakdown - Section 1
Photogrammetry Scan Processing
We captured 88 so-called facial action units from Fred, including the neutral state of his face and all the extreme poses. His outfits were scanned in layers to improve the quality of the reconstruction and make the refining process easier later down the pipeline. Our scanner back then consisted of 250 DSLR cameras with 80-130 mm focal length, 24 of them entirely dedicated to the head area. We used Reality Capture for the reconstruction of the 3D scan data; to enhance the reconstruction quality of our neutral pose and the extreme poses, we synthetically enhanced the captured images with Gigapixel AI.
Working with the Scan Data
Before being further processed, all scans were rudimentarily cleaned from artifacts. We used Wrap3D to align all our reconstructed scans to our neutral pose, representing a fully relaxed face with no emotions whatsoever. This was done to ensure consistency and accuracy during the blendshape extraction process. Once our basemesh was wrapped to the aligned scan, the scanned expression was ready for the blendshape extraction process.
The neutral pose and a by us defined set of extreme poses, which each represented an emotion expressed to the maximum, were further processed and prepared for detailing by enhancing it with extra details; some manually added some generated from textures. Those ultra high res models were then used for baking normal map data which was later used in the engine to visualize Fred's finest surface details and surface deformations.
Generating Additional Data
In addition to the reconstructed geometry data and to recreate even the finest details of Fred's face, we generated displacement maps with a resolution of 16k in Photoshop via highpass filters based on cleaned and refined versions of the captured photogrammetry textures. Depending on the detail and area we generated displacement data for, we used different sampling sizes and adjusted the range of the displacement values to get as close as possible to the real-life reference. Additional heightmaps were generated for all our "hero" heads or rather the neutral pose and all the chosen extreme poses. Later, these textures were used in ZBrush to recreate Fred's details on the 3D mesh.
Refining the Headscans
The chosen extreme poses, along with the neutral pose, got a detailing pass in Zbrush. For that, we used the cleaned scans plus the generated displacement maps as a starting point, fixing the errors caused by the displacement map and adding/refining detail where needed. We made heavy use of the Zbrush layer system to separate the different displacement maps and make manual adjustments; this gave us great control over the intensity of the displacement map detail intensity and to change it nondestructively later on. Since all the wrapped scans share the same basemesh i.e. topology, we were able to use the detailing layer stack from the neutral pose as a base for detailing all the extreme poses. The resulting surface details were then later baked into normal maps.
Outfit Scanning
Since we scanned all of his cloth layers separately, we were able to work very precisely on the individual pieces of clothing. Detailing and refining them separately, where we used a similar workflow as we did for the head scans, working off the cleaned scan and enhancing it with displacement maps and manual detailing, i.e. sculpting. Before putting the outfit back together again, we added all the details that the clothes would create when interacting with each other.
Extracting the Motion
We created a diagram of all our scanned FACs, grouping them into different sections and creating flow charts depicting the gradual intensity of some expression, i.e. smiling. Based on this, we selected the areas of each FAC that we wanted to turn into blendshapes. For this, the aligned and cleaned scanned FACs were wrapped with our head basemesh in Wrap3D. The resulting mesh was brought into Maya, where it was used as a blendshape for our basemesh. All unwanted deformations in the face were masked and the final blendshape exported.

Face Separation Masks
Tech Breakdown - Section 2
Bringing Fred to Life
Capturing the true essence of Fred's acting performance was the main goal of our motion-capturing efforts. It was especially important for us to get any fine nuances that make Fred himself in terms of body movement. To achieve a full-body capturing of Fred's motion, we combined our motion data from our Xsens mocap-suit, our Dynamixyz infrared face-rig, and manual retouch steps to enhance subtle details. Combining this rich datastream through MotionBuilder and Maya was challenging and required a dynamic workflow.
Motion Capturing Session
We started by outlining our overall concept and story. We set an ideal stage for our Digital Human while also adding enough creative freedom for our actor. After our story outline was set, we invited our actor for a mocap session and gave him time to interpret our script and to add his own style to the performance. We used our XSens suit in combination with ManusVR gloves to track the motion of Fred's body with 60 frames per second, which is captured by many different motion sensors inside the suit and gloves themselves. The face is captured separately by the Dynamixyz infrared headcam rig. We recorded different takes in german and english and recorded different facial expressions to test out the range of motion of our mocap-data.
Since the Headcam rig does not have any integrated microphones, we attached one microphone to the side of Fred's head and recorded a separate audio take with an external boom microphone to get high-quality audio of Fred's voice. To sync the 3D motion data with our recorded sound, we let our actor clap his hands, which enabled us to synchronize everything in post easily. Keeping the marker dots from our scanning session wasn't necessary for the software, but it was a nice way to improve the performance of our face capturing, by making it easier to track his facial movements during the processing.


Working with the Mocap Data
We used MVN Animate, a motion capture software from Xsense, to record and export all the mocap data regarding Fred’s body as .FBX files. Those were then imported into Motion Builder where they were cleaned of any visual errors like sliding feet, jittering appendages or intersecting geometry and afterward polished regarding poses and timing. For processing Fred’s facial movements we used Performer2SV from Dynamixyz. The software is able to track defined areas of the face and transfer those movements onto an animation rig.
To correctly transfer the movements onto our facial rig the software needed a set of linked key poses between the video and the animation rig. For that each chosen pose inside the recorded video was carefully recreated with our facial rig and then connected to the specific frame. That way the software can generate everything else based on the movements recorded in the video. The animation than gets exported via a bridge between Performer2SV and Maya directly onto our animation rig for the head. This animation is then also polished by refining certain poses, adjusting timings and sometimes even push expressions further. Once this process was finished the completed head and body animations were exported seperately and then merged inside the Unreal Engine 4.
Tech Breakdown - Section 3
The Body- and Facerig Setup
Our rig for Fred consists of two independent rig systems, one for the body and one for the head, which were later merged inside the engine. Because our goal was to give as much control as possible to the animator while still being realistic and using the scanned data, we decided to create a combined joint blendshape rig for Fred’s face. This means that we have predefined poses for each of his facial movements that are dynamically combined based on the position of the joints/controls while also giving the option to manipulate Fred’s face independent from the blendshapes to enhance the look of certain moves or poses.

Tech Breakdown - Section 4
Engine Integration
Visualizing our actor Fred correctly in 3D is equally as important as 3D scanning and motion capturing. The integration of all different sources into one single unreal engine project, which on top needs to run in real-time, was one of our biggest challenges. Achieving realism and true authenticity plays a huge role in getting our Digital Human as close as possible to our charismatic actor.
Material Setup & Texture Breakdown
Our material setup for Fred’s head is based on the integrated Unreal Engine Subsurface profile shader; we added internal material controls over the different roughness zones of Fred’s face to be able to tweak those values inside the engine easily. In addition to that, we added an angle-based reflection behavior that better reflects the interaction of skin with light. It adjusts the reflections in areas that have a very sharp angle towards the camera.
We also added a wrinkle map setup, which means that we blend a set of 4 normal and 4 albedo maps, with a 4 channel mask defining the different facial zones, depending on the currently active morph targets.
The texture set that was used for Fred includes 4 albedo maps (blood flow maps), 4 normal maps (wrinkle maps), a 4 channel map including a specular level map, a roughness map, a thickness/scatter map, as well as ambient occlusion and cavity data.

Wrinkle Map Setup
Wrinkle maps are used to enhance the visual impact of blendshape by providing details that a blendshape can't display on its own. For example, strong changes in the skin's surface structure, i.e. stretching of pores, wrinkles, etc., and changes in skin color due to blood being shifted around or tissue getting stretched over bones. That's why we used a wrinkle/blood flow map setup to visually enhance Fred's face in motion inside the Unreal Engine 4.
We created 2 sets of 4 textures for our setup, one containing the surface changes, i.e. normal map details, and one containing changes in his skin color. These textures were created by baking the albedo and normal information of Fred's refined extreme poses into textures. Since not all the surface information of each extreme pose was needed, we created a four-channel mask for each composite wrinkle maps defining the different zones where the details would be applied later, i.e. the eye area, mouth, area, cheeks, forehead, etc.
These masks were also used to blend the engine's wrinkle/blood flow maps. The big challenge was how to drive this setup dynamically since we didn't want to keyframe the wrinkle map intensity on top of the animation. So we created a blueprint setup that read the influence of each of Fred's 261 blendshapes, driving our material setup by controlling the masks inside the engine.
Hair Creation Pipeline
Fred's hair was created entirely from scratch based on our references. We used XGen, an integrated tool in Maya, for the grooming process. All grooms were started by creating splines on the surface of Fred's head model, representing his hair's growth direction. Those splines were then converted into so-called guides for the groom. By adding clumping, curls, and length variation, we strived to recreate Fred's hair as close as possible. That way, we created grooms for each of his hair types i.e. his top hair, beard, lashes, eye brows, and peach fur. The created grooms were all exported as alembic files and then imported into Unreal Engine 4 via the alembic hair plugin, where they were attached to Fred's skeletal mesh.
Rendering
All footage was rendered inside Unreal Engine 4. We leveraged the integrated movie render pipeline to organize our renderings and render passes. This also gave us an easy way to override certain render settings on render time, making it possible to crank up the quality of certain postprocessing effects, for example, depth of field, motion blur, texture filtering, and anti-aliasing, above what is possible in realtime.
Final presentation
MEET THE DIGITAL HUMAN
We are constantly interacting with other human beings, no matter where we go. Interacting with virtual doubles and digital assistants gets more and more usual. As a result, the next logical step is to create more realistic Digital Humans who can interact with you.
Behind the Scenes:
The Digital Human
Join us and dive into the story behind the Digital Human and learn more about how it all started. Get a look behind the scenes and the process of how we started to create our first digital doubles. Starting with early concepts, prototypes and finding ways to develop our Digital Human.
